Simplifying WebSockets User Interface (UI) Clients with Happy Pub/Sub Patterns

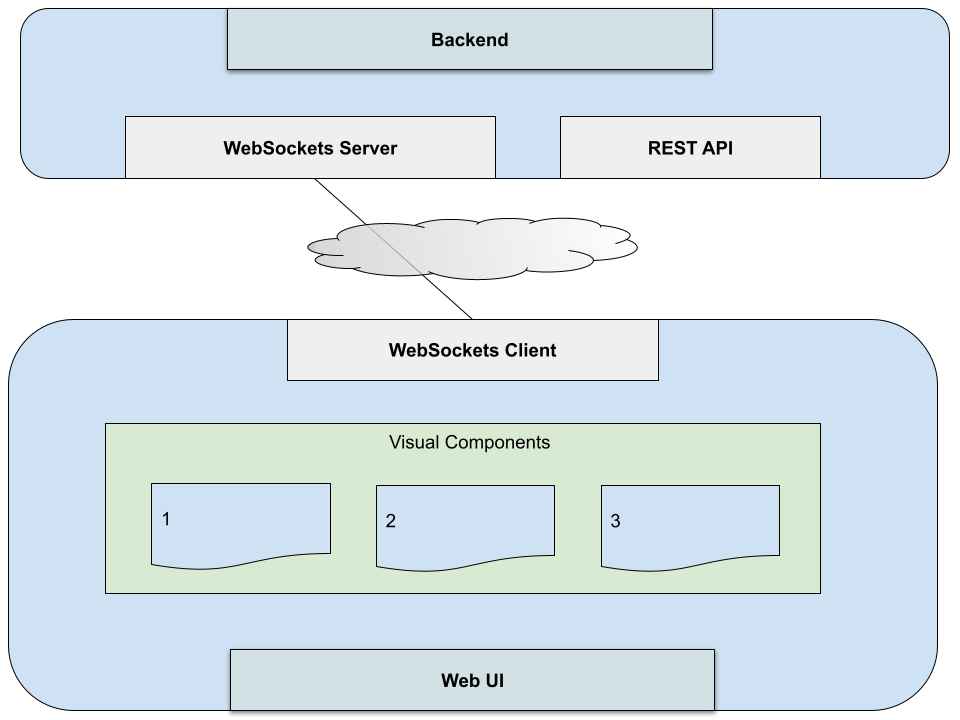
A back-end WebSocket for live streaming data can typically offer subscriptions to data. Your client UI will typically have one connection to your back-end for all your subscriptions. The challenge becomes how to you handle many components in your UI subscribing to it considering that

  • which components are available can be user driven
  • the components are not aware of each other
  • each component can vary what it subscribes to based on user interactions
UI client with multiple components using WebSocket connection

The solution to this is to centralize a pub/sub pattern near the client WebSocket connection.

Component Subscription Requirements

There are two types of subscriptions at play. One is subscribing to a topic or channel. The other is subscribing to content or data within that topic or channel.

To give an example, a market data API might provide both Level I and Level II quotes, which have very different data structures. This would be a topic or channel a component might subscribe to. Once it is listening on this channel, it may then subscribe to specific content such as quotes for IBM, TSLA and AMZN.

A component that requires Level I quotes will do two things to begin to receive data

  • Listen to or observe the Level I channel
  • Request a list of symbols (content) for its Level I subscription as they change

It can begin observing the channel upon creation of the component. As a user interacts and adds or removes stock symbols, it will update its list of symbols it is subscribing to.

The component sends its complete current list, not the changes. If it is subscribing to IBM, and the user adds TSLA, it will now send the new updated list of [“IBM”, “TSLA”]. If it sends an empty list, it is basically unsubscribing from the data. However, it can continue to observe the channel until it is destroyed.

As cleanup, when a component is destroyed, it should unsubscribe from the content (stock symbols) as well end its channel observation.

Subscription and Publishing Services

To handle these component data subscription requirements, we’ll add two services to our UI client.

Stream Request and Publisher Services

A service in the UI is an injectable singleton that handles shared state around a concern. In our case, we have one focused on content subscriptions (e.g., “IBM”), and another on channel subscriptions (e.g., “Level I”) through which the content will be broadcast.

Note that the publishing of data in your Publish Service via a pub/sub topology can happen via various techniques. In our discussion we’ll focus on using multicast (or “hot”) observables such as what is provided in the RxJS library, which has its own topic subscription semantics.

The publishing service is where you’ll have each type of channel you want. In our stock quotes example, you can have one channel for Level I quotes, and another for Level II quotes.

Both of these services are injected in each subscribing UI component and then used by the component to drive the content it receives.

As your Stream Request Service is handling the mediating to the WebSocket, it is the only service connecting to it. It is not a hard rule that this service also handle routing. It is just one way to route it. The important thing is you do have a service centrally routing your messages and connecting them to your publisher, broadcasting them to your topics based on type of content. You have a lot of freedom here on how you route messages. That really is another discussion. The important thing is that by connecting the publishers to your WebSockets through an intermediary, you have created routing ability within your UI.

The cohesion between content subscriptions and routing of incoming messages makes sense as these concepts are already tied to your WebSocket. If you have more than one back-end you are connecting to, you can create individual services for each one doing this, then optionally put them behind a facade of a single service.

Your publisher, however, should not be coupled directly with the WebSocket because it can potentially have multiple sources of data. This part of our design pattern creates loose coupling between data sources and consumers.

One thing you can do is also add a channel to your publisher just for your UI that your components can publish on, instead of just listening on. This provides a way for your components to talk back to any service without having a direct connection to it…. aka “loose coupling”. Because components can also listen to these types of channels, this becomes a means for components to talk to each other without being aware of each other’s existence. This is one of my favorite benefits of observable patterns.

Similarly, you can have a channel that talks back to your back-end service. We are already doing that in a sense by subscribing. But, you can go beyond that by, for instance, being the source of data, such as real-time sensors or crowd sourced information.

Note that while we haven’t discussed it, we have the option of a REST service in this topology. This is because some back-ends will require REST calls to subscribe to data, while others will require messages via your WebSockets pipe. If you are just subscribing to data, there is no real right or wrong answer for which method is ideal. The important thing is that once the subscription is honored, receiving data comes through the WebSocket to provide one consistent pipeline of a single timeline. The client hopefully never has to combine REST and WebSockets to construct the actual state of data being subscribed to. That is, you wouldn’t want to have to combine both REST and WebSockets to construct the complete quote of IBM. Your WebSocket provides a single timeline of streaming events and data so your UI components can focus on consumption and presentation.

Posted in Angular, Development, Technology, Vue, Web | Tagged , | Leave a comment

Learning the Stacks SDK/API – The Demo Client

Stacks has a RESTful API and a library called Stacks.js. Stacks.js is a set of libraries for Typescript clients “which provide everything you need to work with the Stacks blockchain.”

To develop a better understanding, I created a web client, a single page app (SPA), to test out the various capabilities exposed by Stacks.js and the RESTful API hosted in Github:

https://github.com/PUN-app/PUN-client

PUN is built using Vue 3 and Typescript.

The client uses the tools required to create a dApp. This includes a demo of Accounts, Authentication, Gaia, Cyphering and Contracts.

Posted in Crypto, dApps, Technology, Vue, Web | Tagged , | Leave a comment

Mapping Vue 3 Pages to Firebase Hosting

Vue 3 has a concept called pages that let’s you define different HTML pages acting as entry points to your app.

You define these in vue.config.js in the root of your project. Here is a sample:

module.exports = {
  pages: {
    'index': {
      entry: './src/main.ts',
      template: 'public/index.html',
      title: 'Home',
      chunks: [ 'chunk-vendors', 'chunk-common', 'index' ]
    },
    'about': {
      entry: './src/main-about.ts',
      template: 'public/about/index.html',
      title: 'About',
      chunks: [ 'chunk-vendors', 'chunk-common', 'about' ]
    }
  }
}

You’d expect these pages to then be accessed via / and /about URLs. This works in development. However, when you deploy to Firebase Hosting, your /about URL does not work.

The reason is Firebase has no concept of Vue. It’s just an HTTP server looking for a file, and this file doesn’t exist.

If you look in your deploy folder for firebase generated when you do a build, you’ll see it did create an about.html file. All you need to do is map your URL to this file.

Firebase provides configuration via firebase.json, also in your root folder. Here is a sample configuration:

{
  "hosting": {
    "public": "dist",
    "ignore": [
      "firebase.json",
      "**/.*",
      "**/node_modules/**"
    ],
    "rewrites": [
      {
        "source": "about",
        "destination": "/about.html"
      },
      {
        "source": "**",
        "destination": "/index.html"
      }
    ]
  }
}

In the rewrite section, we direct /about to /about.html. We also added another rewrite to direct everything else to the main index.html. This avoids pesky 404 errors.

Posted in Development, Uncategorized, Vue | Tagged , | Leave a comment

Protected: Ohio at Risk

This content is password protected. To view it please enter your password below:

Posted in Health, Personal | Enter your password to view comments.

In a world of ignorance, knowledge is power

Here is a very well documented list of the facts on using masks to try to control transmission from the Association of American Physicians and Surgeons (AAPS): Mask Facts

And for those who like watching a video:

Why Face Masks DON’T Work, According To SCIENCE
by Ben Swann of ISE Media, July 15, 2020, on Facebook with useless fact checking

STUDY: Universal Masking in Hospitals in the Covid-19 Era (May 21, 2020, nejm.org)

“We know that wearing a mask outside health care facilities offers little, if any, protection from infection. Public health authorities define a significant exposure to Covid-19 as face-to-face contact within 6 feet with a patient with symptomatic Covid-19 that is sustained for at least a few minutes (and some say more than 10 minutes or even 30 minutes). The chance of catching Covid-19 from a passing interaction in a public space is therefore minimal. In many cases, the desire for widespread masking is a reflexive reaction to anxiety over the pandemic.”

A cluster randomised trial of cloth masks compared with medical masks in healthcare workers (Apr 22, 2015, nih.gov)

Posted in Health, Learning | Tagged | Leave a comment

Roasted Red Pepper Relish

This easy to make roasted relish is one of the healthiest thing you can make. But, it is also one of the tastiest thing you’ll ever eat. It can be used to add robust flavor to new and traditional dishes. This will take great things you make and turn them into the best you’ve ever had!

Ingredients

3 red bell peppers
1 small or medium onion (red or yellow)
10 cloves of garlic
10 habaneros
olive oil
1 lemon
red wine vinegar
salt
pepper
(optional) greens: either cilantro, parsley or kale.

Directions

Clean produce. Peel the outside of onion. It’s OK to cut the onion into halves or quarters, as that can help peeling.

In a bowl, cover peppers, onion and garlic with olive oil. Salt and pepper. Cover the produce completely with the oil to protect it. Roast in the oven at 375F for 30 minutes.

TIP: Form a circle with the bell peppers, then pile the rest of the smaller ingredients in the middle. This prevents the the smaller ones, particularly the habaneros, from roasting faster than the big peppers.

You can let it cool before you handle it. Drain the water and remove the seeds from the peppers and remove any stems. If it is easy, remove the white parts the seeds cling to.

NOTE: It is critical you get all the seeds out or the lectins will give you the shits. Technically, it isn’t known to hurt you. But who wants to run to the bathroom every 10 minutes? This happens because your body can’t process lectins so goes into quick ejection mode.

Put the peppers, onions and garlic in your food processor. Add your greens. Dash in some red wine vinegar. Blend until desired consistency.

Toss the blended relish back onto the bowl where you had the olive oil so you don’t waste the extra that was at the bottom. Squeeze in the lemon. Stir well.

Enjoy! Refrigerate leftover portions. The vinegar and lemon will both give it flavor and help to preserve it longer.

How to Enjoy

There are a million uses for it. I’m looking forward to hearing how others use it. You can snack with it, add it to main dishes, spice up guacamole, and use in just about anything you want a little flavor in.

Here are some ways I’ve used it so far:

On homemade bread with mozzerella
pepper relish and fresh mozzerella on crackers

On baguette slices, pita bread, tortilla pieces, crackers or tostidos. You can add other things, too. While my favorite is on baguette slices, I can’t boast having fresh baguette on hand every day. It balances well with fresh mozzarella!

In a taquito! It is possible to make both the best tasting taquito and the healthiest taquito in the world AT THE SAME TIME! The pepper relish is the key.

Every taquito starts with a very generous portion of roasted red pepper relish:

My Chicken Taquito: Pepper relish, cheddar cheese, chicken and kale in a tortilla

Health Benefits

Onions, peppers and garlic are super foods! The list of benefits is long. One of the most important things they’ll do is boost your immunity, which impacts a lot of your overall health.

5 health benefits of red peppers

9 Impressive Health Benefits of Onions

13 Amazing Health Benefits of Garlic

Food Picture Porn

Red Bell Peppers
Onions
Covered in oil, ready for the oven
Out of the oven
Roasted Habaneros

Posted in Food | Leave a comment

Using Duration in Typescript

I’m converting Java 8 code to Typescript. Java 8 introduced a great Duration class that uses ChronoUnit to specify units such as DAYS or HOURS. You then instantiate a duration using that:

  Duration.of(3, SECONDS);
  Duration.of(465, HOURS);

Duration can then interact with LocalDateTime objects. To start, it can obtain a Duration from the difference of two times.

    Duration elapsed = Duration.between(startTime, endTime);

That gives us two ways to instantiate it. The latter can result in a conceptual combination, such as “3 days, 4 hours and 21 minutes” that the former method doesn’t result in.

We can also compare two durations to see which is greater:

boolean result duration1.compareTo(duration2) >= 0;

So how do we do that in Typescript?

Requirements

To summarize our requirements from our Java uses:

  1. Instantiate in time units, such a “6 weeks”. This would likely come from a human interface where a user is specifying a duration or interval.
  2. Calculate the difference between two dates and represent this in various usable forms, including human.
  3. Compare two periods to determine which is greater.

As long as we can convert a duration to milliseconds, it is easy to compare. This simplifies our last requirement. Likewise, if we can convert milliseconds to a duration object that has the capabilities we need, that solves requirement #2, since it is easy to calculate the difference of two Date objects:

diff = Math.abs(date1.getTime() - date2.getTime()); 

The issue we have is that not all human durations are easily translated into milliseconds. A month, for instance, is not a concrete block of time. It conceptually depends on a calendar. A duration of 5 months may simply require adding 5 to the month of a date, so that 5 months from Feb 5th is July 5th.

Leap years are another anomaly depending on the calendar so that not all years have the same number of days.

You really have to decide how these fit into your requirements for your application. I’ve chosen to treat them as bonus features in my case rather than core requirements.

NPM Libraries

duration (https://www.npmjs.com/package/duration)

This works great for calculating the difference of two Date objects. You then have the ability to view the result as either a total of any given unit, or as human breakdown, such as:

10y 2m 6d 3h 23m 8s 456ms

Because we can convert to total milliseconds, we can compare two durations.

This solves requirements #2 and #3, but does not provide a solution for requirement #1. It seems you can only instantiate from the differences between two dates.

to-time (https://www.npmjs.com/package/to-time)

This library meets our first requirement, the ability to instantiate with time units. It also allows us to convert to another unit easily:

toTime('1 hour').seconds(); //3600

You can even add up various units:

toTime('1 Year 365 Days 4 Hours').hours(); //17524

While it can’t calculate the difference between dates, you could calculate the milliseconds between dates, and then use that to create a time frame instance:

const frame = toTime.fromMilliseconds(500005050505005);

And, of course, since you can convert any time frame to milliseconds, you can compare two.

Together, this technically meets our 3 core requirements.

duration-converter (https://www.npmjs.com/package/duration-converter)

This also has the ability to instantiate from both number of units and difference between dates:

const sevenWeeks = new Duration('7 Weeks');
const threeDays = Duration.fromDays(3);

const a = new Date(2019, 3, 14);
const b = new Date(2019, 3, 15);
const betweenDates = Duration.between(a, b);

Because you can convert a duration to milliseconds, you can effectively compare two durations. This meets all 3 requirements.

The creator put a warning on the NPM module page that leap years are ignored as all years are treated as 365 days.

date-period (https://www.npmjs.com/package/date-period)

This looks promising. But, the documentation is lacking. It says it mimics PHP’s DatePeriod class. If you are a PHP programmer, you might find it useful.

@js-joda/core (https://js-joda.github.io/js-joda/manual/Duration.html)

NOTE: I completed this blog post, used date-converter for Duration, then realized in the next class I converted I also needed LocalTime. Only then did I discover this class, making this an update to this post the next day.

This appears to meet all the requirements because it is basically the same as the set of temporal classes added to Java 8 because Joda-Time was the original Java library that was adopted as the standard in Java 8, and js-Joda is a Javascript implementation of it.

According to a 2018 GitHub Issue, they changed it a little to be compatible with Typescript.

Summary

In the end we have three NPM modules that can meet our requirements. The to-time and duration-converter libraries do work, albeit with limitations and creativity. However, js-joda appears to be a complete solution if you are porting Java 8 code.

Posted in Angular, Development, Technology, Typescript | Tagged , , , , | Leave a comment

Using FirewallD as a Linux Router

There are already blogs out there on how to use FirewallD as a router. In general, you enable masquerade. However, I could not find any that mentioned how to do it if you have public static IPs.

Prior to using FirewallD, I used iptables for over a decade without an issue. Once FirewallD was setup correctly on a new Internet router on Centos 7, I haven’t had any issues. It has been running rock solid.

There were some lessons I had to learn the hard way due to the lack of documentation both on the blogs on using it as a router and via FirewallD documentation itself.

Presuming you have two zones labeled external and internal, your first step is to enable masquerade for your external zone.

firewall-cmd --zone=external --add-masquerade --permanent

The tricky part was what to do with the internal zone. If you run the same command on it, it will initially appear to run fine. The problem with it is how the IP addresses appear on your servers, which can quickly snowball into a huge problem with security.

The problem that I ran into is that I ran my email server for a week as an open relay and didn’t realize it until my outgoing email was getting rejected due to being blacklisted as a spammer. When I traced the issue, it was because every connection to it appeared to be coming from the internal IP address of my internet router (firewalld), which it trusted. Before you know it, you’re a spam sender for Russian bots.

But, if you don’t enable masquerade on internal, you will be the only one who can’t get to your servers via their public IP addresses. The rest of the world gets routed OK. You get on the Internet OK. You can access your servers via their internal IP OK. But, if you access yourpublicdomain.xyz (pointing to one of your public IPs) from inside your network, your router won’t route you.

It turns out there is a very happy place in the middle using the add-rich-rule option. Let’s say your private subnet that your Internet router is a part if is 10.10.5.0/24, you would simply issue this command:

firewall-cmd --permanent --zone=internal --add-rich-rule='rule family=ipv4 source address=10.10.5.0/24 masquerade'

This enables masquerade for your internal zone ONLY for traffic originating from inside your network. Now you can reach yourpublicdomain.xyz from inside your network without a problem. Meanwhile, if you check your server logs, they are all seeing the correct public IP of outside traffic, and can require SMTP authentication or apply whatever other security protections you have for untrusted sources.

Forwarding ports

It’s pretty simple. Note that you need to do it on your internal as well as your external even if your destination address is public. So, presuming you were running a web server on public IP 1.1.1.1 that is on your local 10.10.5.51, you would forward ports to it with the following commands:

firewall-cmd --permanent --zone=external --add-rich-rule='rule family=ipv4 destination address=1.1.1.1 forward-port port=80 protocol=tcp to-port=80 to-addr=10.10.5.51'

firewall-cmd --permanent --zone=internal --add-rich-rule='rule family=ipv4 destination address=1.1.1.1 forward-port port=80 protocol=tcp to-port=80 to-addr=10.10.5.51'

You’d repeat that for port 443 to support SSL.

Note that because you are using rich rules, you can easily limit access to internal only for something like SSH via a public IP (and your domain):

firewall-cmd --permanent --zone=external --add-rich-rule='rule family=ipv4 source address=10.10.5.0/24 service name=ssh destination address=1.1.1.1 log prefix="SSH Access" level="notice" accept'
Posted in Networking, Technology, Technology Services | Tagged , , , , , , | Leave a comment

Creating a new Angular Site on Google Firebase

Angular is a framework for creating front-ends for websites. Technically, the site is static from a web hosting perspective, meaning that in and of itself it does not have a database, but rather only serves static files from the web server. From a user perspective, it can appear to be very dynamic, with the ability to log in, create and work with data, and other normal web application behaviors.

The dynamic portions of an Angular app require integration with back-end services. Angular apps simply call out to these external services, and are not typically a part of providing the services.

The creation of these services is both out of scope for angular and out of scope for this tutorial. Instead, we’ll create a very simple static website with Angular and deploy it to Firebase.

Firebase is a set of services provided by Google. One service is hosting, which primarily hosts static websites such as those created with Angular. Google offers a free tier that allows you to get a site up and running quickly and easily.

Prerequisites

You have the following installed:

  • Node 10+ (node -v)
  • NPM 6+ (npm -v)
  • Angular CLI 8+ (ng --version)
    howto

Create Angular app

In the folder where you want to create the app, run

ng new <your-app-name>

It will ask you questions. If you are not sure what answer to choose, you can use the defaults. Routing allows you to have URLs that point to pages, which technically simulates multiple pages even though it is still a “single page” application. This is useful if you have menu navigation. The CSS options allows you to use CSS templates to add functionality.

Launch your app:

npm start

Open in your browser: http://localhost:4200/

You can now edit the src/app/app.component.html file to make it your own. When it looks good, build it for production.

ng build --prod

This creates static output in a dist folder in your project. This is what we’ll deploy to Firebase.

Deploy to Firebase

Use your Google account to log into firebase.google.com. Then click on “Go to console” in the top right. Create a new project and give it a name. Now you can come back to the console and drill into your project at any time.

Intall Firebase on the computer with your Angular project with the following command. This will update it if you already have it installed. Prefix with sudo if it fails with permission errors without it.

npm i -g firebase-tools

You will primarily use the command firebase to interact with it. You can use these commands to log into and out of a Google account:

firebase login
firebase logout

While in your project’s root directory, run

firebase init

This will fire off options to choose from. Begin by selecting Hosting. Select existing project if you created via the web console, or new otherwise. For your public directory, look in your dist folder. if it created another folder under it for your project, then you’ll include that. Let’s say your project is called helloworld, your public folder would be:

dist/helloworld

You can choose single page app since that is what Angular created.

Once it is done setting up the project, your process for deploying to Firebase will be to do a prod build to repopulate the dist folder, then to run a Firebase deploy command:

ng build --prod
firebase deploy

Posted in Angular, Development, Technology, Web | Tagged , , , , | Leave a comment

Protected: The Super Rich, News and Profits

This content is password protected. To view it please enter your password below:

Posted in Finance, Investing, Trading | Enter your password to view comments.